
3.1 Glaucoma Examination
- Inspection, Visual Acuity, ± IOP, Refraction
- Anterior Segment
i. Conjunctiva
ii. Cornea
iii. Anterior segment
iv. Iris
v. Lens
vi. Gonioscopy - Optic Disc
i. Disc
ii. Peripapillary atrophy
iii. Cup
iv. Vessels
v. Nerve fibre layer defect - Additional
i. Central corneal thickness
Patients with glaucomatous disease frequently appear in clinical examinations because they are common, have chronic slowly progressive pathology, and often pose a multi-disciplinary diagnostic or management dilemma. Although most of the examination will be focused on the optic disc, candidates should remember to look at the anterior segment for clues to secondary glaucomas.
When examining a patient with glaucoma, the aims of the examination are to determine:
- The status of the angle (including if open or closed)
- If there signs of secondary glaucoma
- The stage of the glaucoma (mild, moderate, severe, end-stage)
- The risk and rate of progression
- Any surgical or medical treatment that has been performed or could be offered
- Any complications of glaucoma that have developed
Detection of one sign (e.g. a closed angle) should prompt the candidate to look for associated signs (e.g. a peripheral iridectomy). Always be aware that patients with “glaucoma” may instead have neuro-ophthalmic problems and have been mis-diagnosed previously. The excellent candidate will always begin their assessment by asking themselves: “does this patient actually have glaucoma?”
- Spectacles?
- Drops?
- Visual aids (Cane, guide dog, family member)?
- Syndromic facies?
- Buphthalmos? (more often easier to see from afar, indicates congenital glaucoma)
- Periorbital erythema or orbital fat atrophy (from drops)?
- “May I have the vision, refraction and IOP please? I would also check the colour vision.”
- Hypermetropes will generally have shallower angles
- Myopes will generally have deeper angles. A “moderate” deepness anterior chamber in a high myope may be pathological.
- Due to the semi-invasive nature of Goldmann applanation tonometry, it is rare that it will be allowed in examinations. Nevertheless the candidate should remember to ask for the IOP. The time and dilation status (usually undilated) should be recorded
- Colour vision abnormalities indicate either extremely severe glaucoma or non-glaucomatous optic neuropathy
Begin with general inspection.
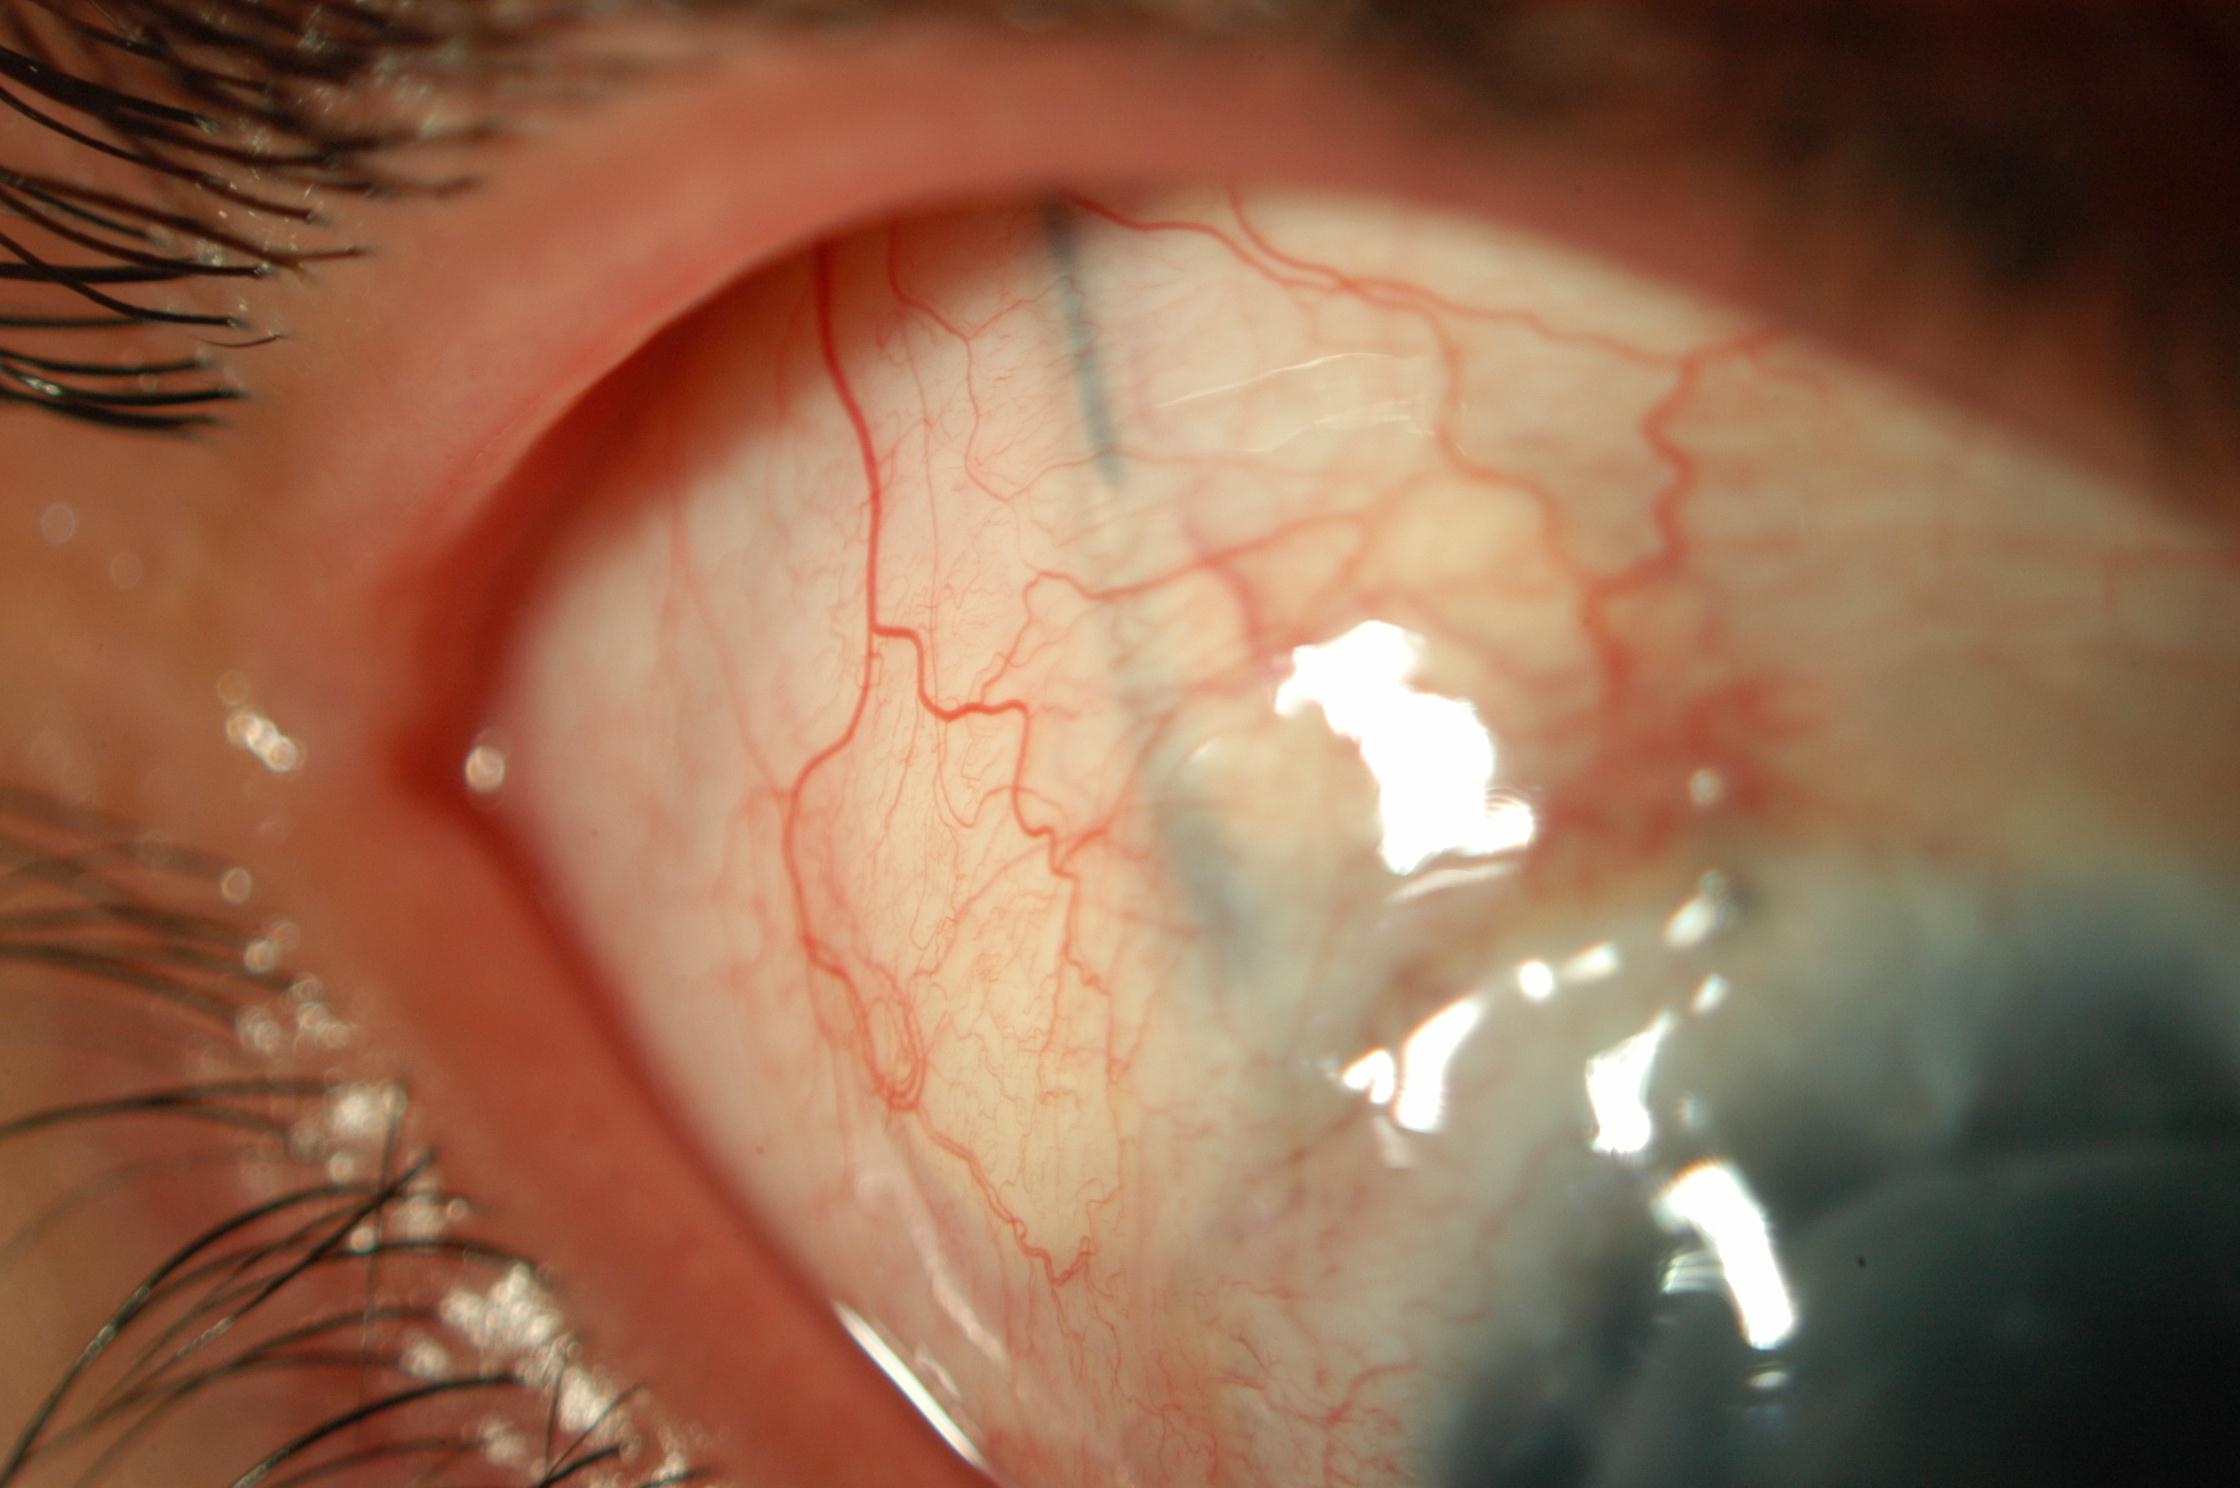
- Look underneath the upper eyelids for prior glaucoma surgery. Missing this will result in failure
- Assess conjunctival mobility
- Assess any blebs: size, height, thickness, vascularity, presence of microcysts
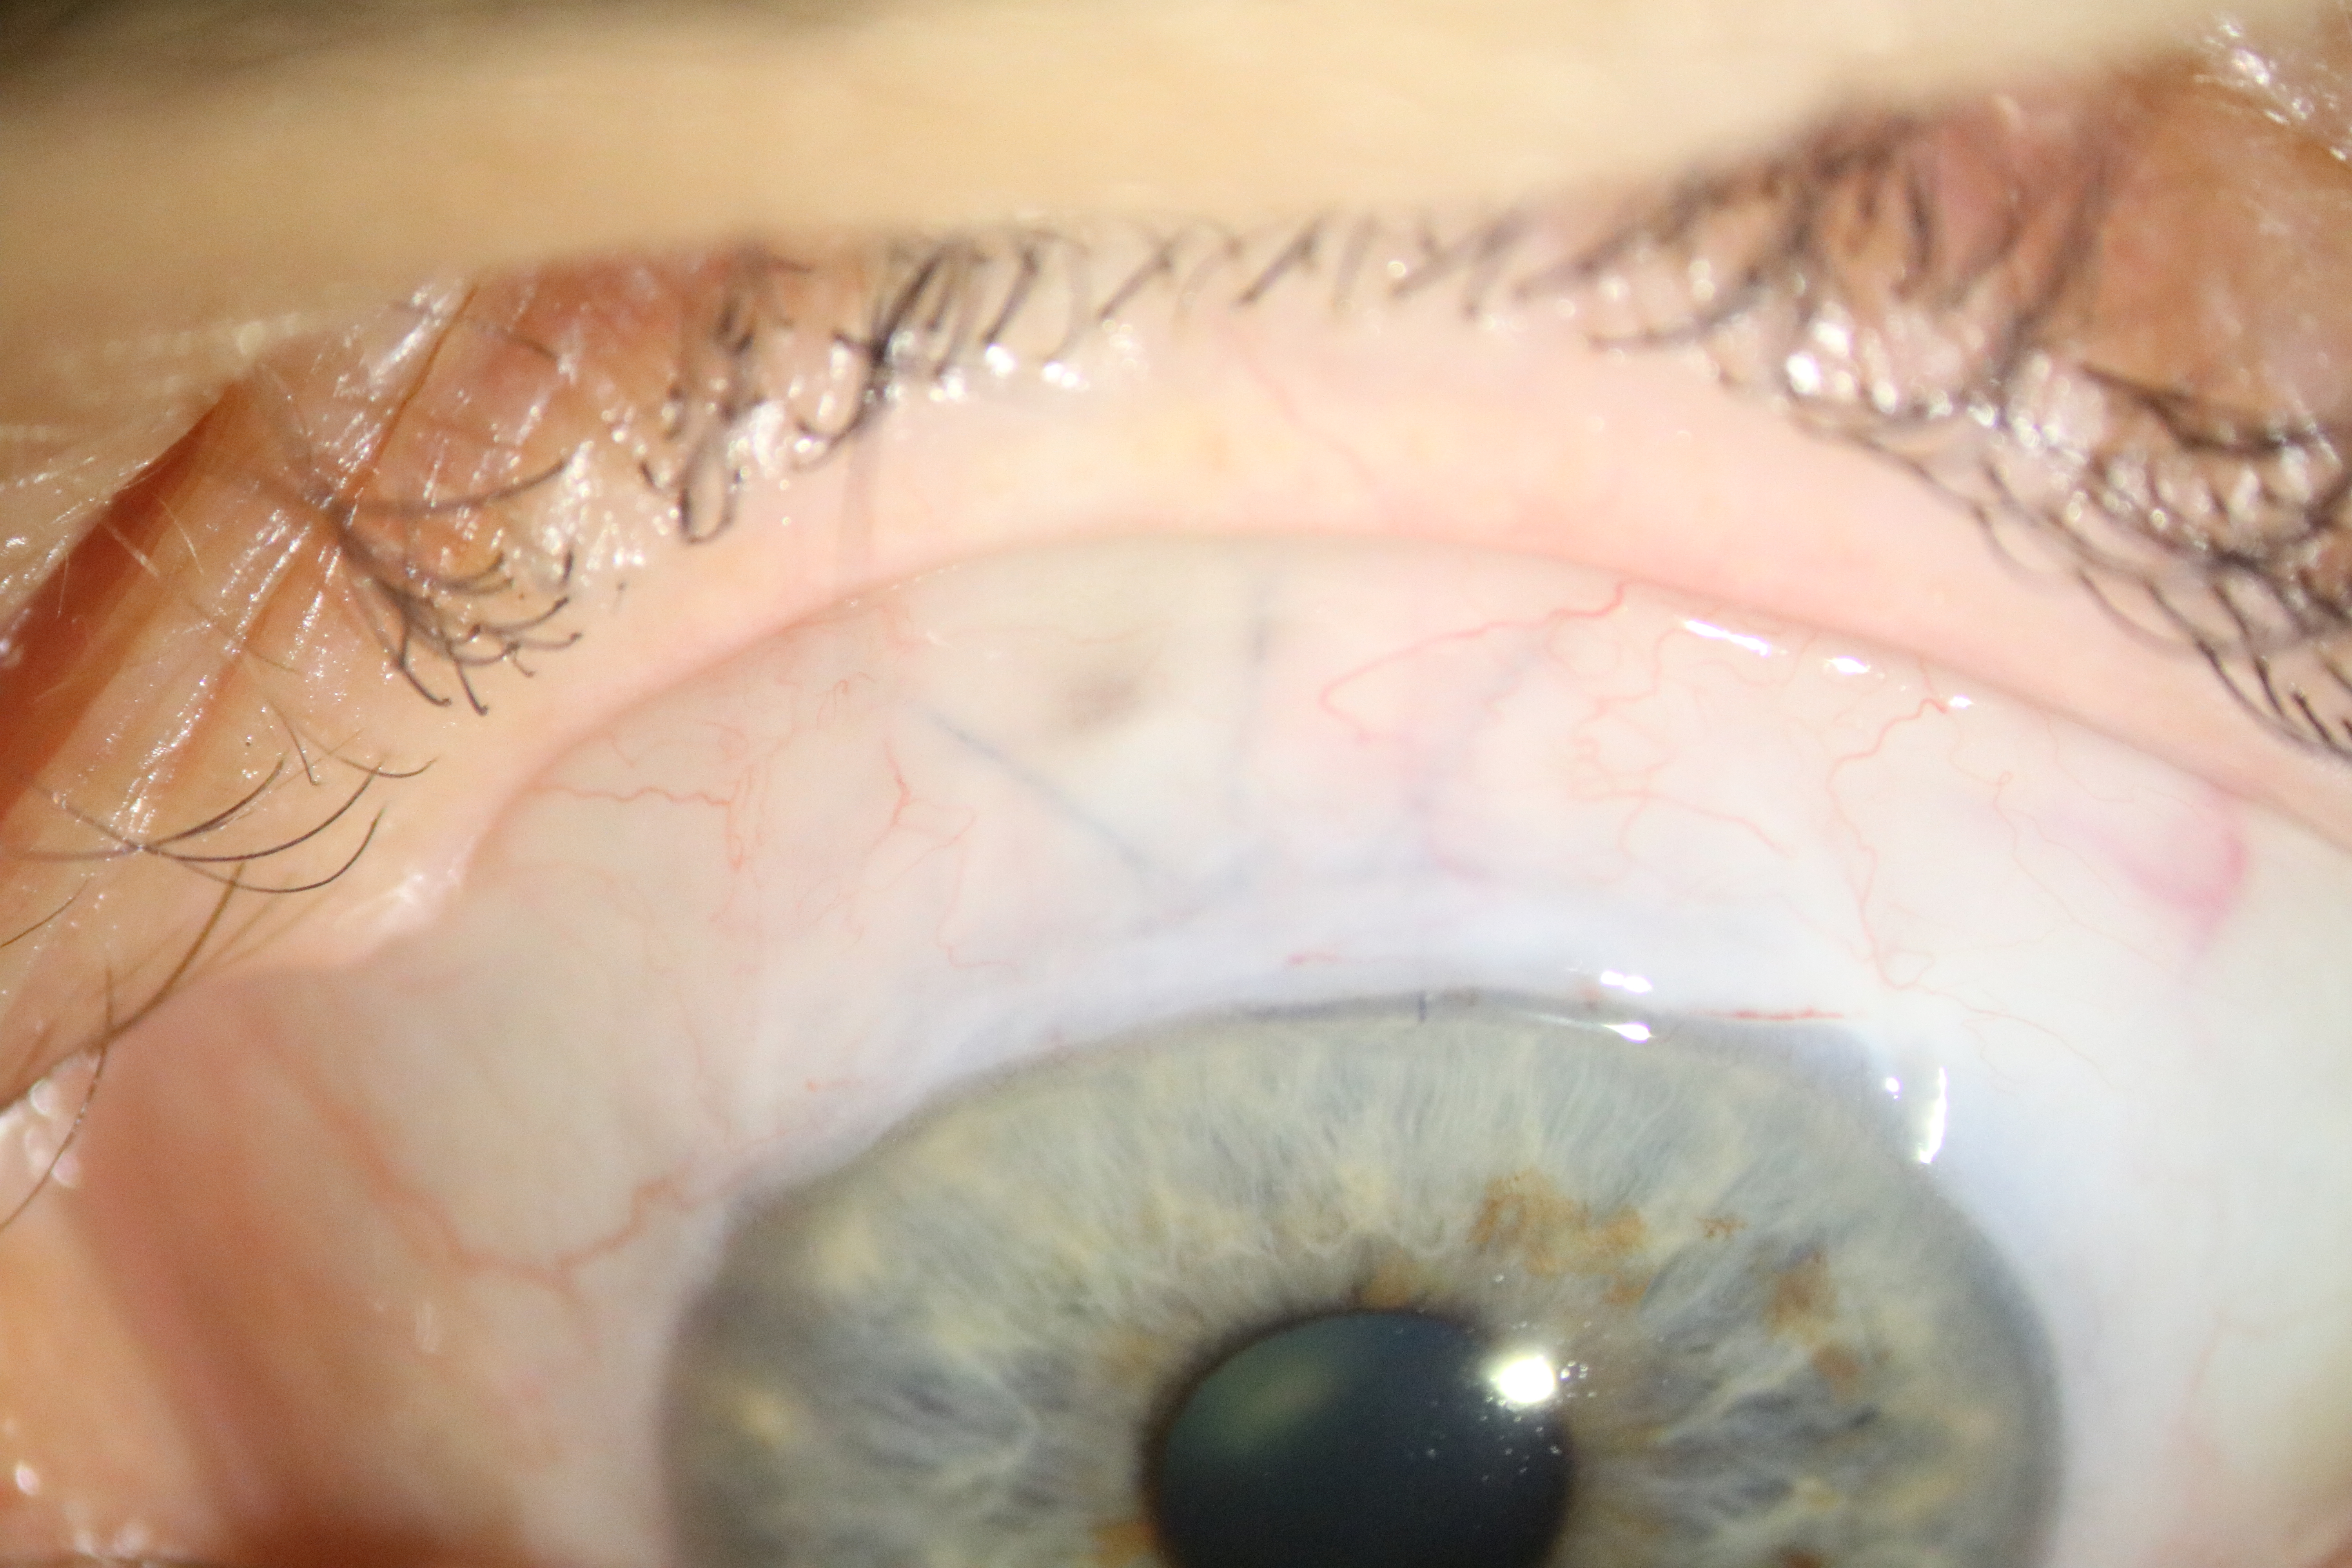
- Krukenberg spindle (Pigment dispersion syndrome - PDS)
- Keratic precipitates (uveitis, fine stellate pancorneal in Fuch’s Heterochromic Iridocyclitis)
- Beaten metal appearance (ICE syndrome)
- Enlarged corneal diameter, Haab striae (congenital glaucoma)
- Reduced corneal diameter (anterior segment dysgenesis)
Estimate depth with the Van Herick technique:
- Aim a thin slit beam of light at 60º at the temporal limbus (i.e. wide out)
- Compare Corneal thickness: Anterior chamber depth (1:¼ or narrower suggests that angle closure is possible)
- NB: This is not as accurate as gonioscopy
- Deep
i. Myope
ii. Pigment dispersion syndrome - Shallow
i. Hypermetrope
ii. Angle closure
Look carefully for an anterior chamber tube.
Heterochromia
Fuch’s heterochromic iridocyclitis
Posterior Bowing
Pigment dispersion syndrome
Transillumination
- Pigment dispersion syndrome (mid-peripheral)
- Pseudoexfoliation, PXF (pupillary)
- Herpes (posterior pigment epithelium)
- Laser burns, surgical PI (this is your last chance to find a previously missed trabeculectomy)
Rubeosis Iridis
- Orbital tumours
- Scleral buckle
- IOID
- TED
Large
Phacomorphic
Subluxed, Phacodonesis
PXF
Hoarfrost Ring
PXF
Cataract (PSC)
Steroid drops
Due to the semi-invasive nature of this procedure, it is rare that it will be allowed in examinations. Nevertheless the candidate should know how to perform gonioscopy and ask for the findings. The procedure is outlined below:
- Darken the room (lighted rooms with resultant pupillary constriction can falsely “open” an occludable angle)
- Local anaesthetic drop. The patient should be undilated
- Gently place gonioscopy lens on the patient’s eye. Try not to push too hard (especially with dynamic indentation gonioscopic lenses), otherwise the angle may inadvertently be opened. The patient should be looking straight ahead- if they look away from the mirror the angle will look narrower than it actually is
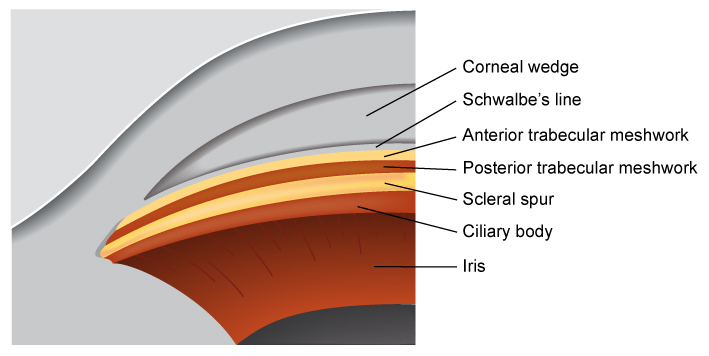
- Begin by using a thin slit beam (45, vertically for superior and inferior mirrors, horizontal for left and right mirrors) to find the Corneal Wedge and then Schwalbe’s Line (the peripheral edge of Descemet’s membrane). Be careful not to mis-locate Schwalbe’s Line when it is anteriorly displaced (posterior embryotoxon) or heavily pigmented. Once found, turn the light intensity down (dim) and shorten the beam. Attempts should then be made to visualize the other components of the angle (from anterior to posterior):
- Schwalbe’s Line (SL)
- Anterior trabecular meshwork (ATM)
- Posterior trabecular meshwork (PTM) – usually more heavily pigmented
- Scleral Spur (SS)
- Ciliary Body (CB)
Assess:
a) Open or Closed?
Irido-trabecular (ITC) contact can be:
- Appositional. This can be demonstrated with dynamic indentation gonioscopy- gentle pressure may open an occludable angle
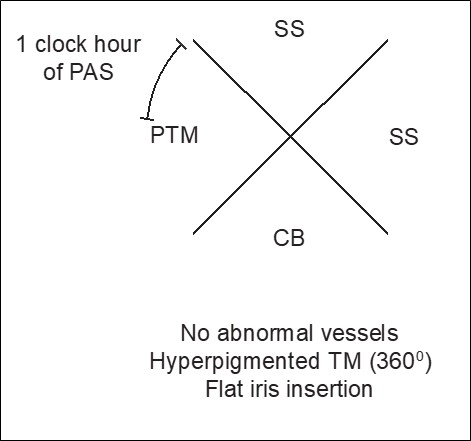
- Synechial (Peripheral Anterior Synechiae, PAS). It is important to differentiate iris processes (which are physiological) from PAS (which are more solid, uniform and old their form against the iris even during indentation)
There are several grading scales for documenting how open the angle is. The most direct method is to document what structures (described above) are visible. Other grading systems include:
Shaffer
Increases in angle from Grade 0 (0°) to Grade 4 (35-45°).
Spaeth
Increases in angle from Grade A to E
Sheie
Decreases in angle from Grade I to IV
Gonioscopy should be performed at rest (with minimal pressure on the cornea) to show the apparent insertion of the iris, and dynamically (by indenting the cornea with the gonioscopy lens) to assess the true iris insertion point. This is only possible with non-flanged gonioscopy lenses. The findings should be recorded together: e.g. “TM → CB (indent)”.
b) Vessels
- Normal
- Neovascularisation of the angle (NVA)- fine branching vessels that run over the scleral spur
- Fine twig like in Fuch’s Heterochromic Iridocyclitis
c) Trabecular Meshwork Hyperpigmentation
- PXF (Sampaolesi line anterior to Schwalbe’s line)
- Pigment dispersion syndrome
- Uveitis
- Trauma, Laser
- Angle closure attacks
d) Iris Insertion
Concave (bowed posteriorly), plateau, flat, convex (bowed anteriorly).
Remember that each mirror in an indirect gonioscope look at the opposite angle (the superior mirror looks at the inferior angle etc.). Always compare both eyes - 360° angle recession can be mistaken for just a “deep angle” if only one eye is inspected.
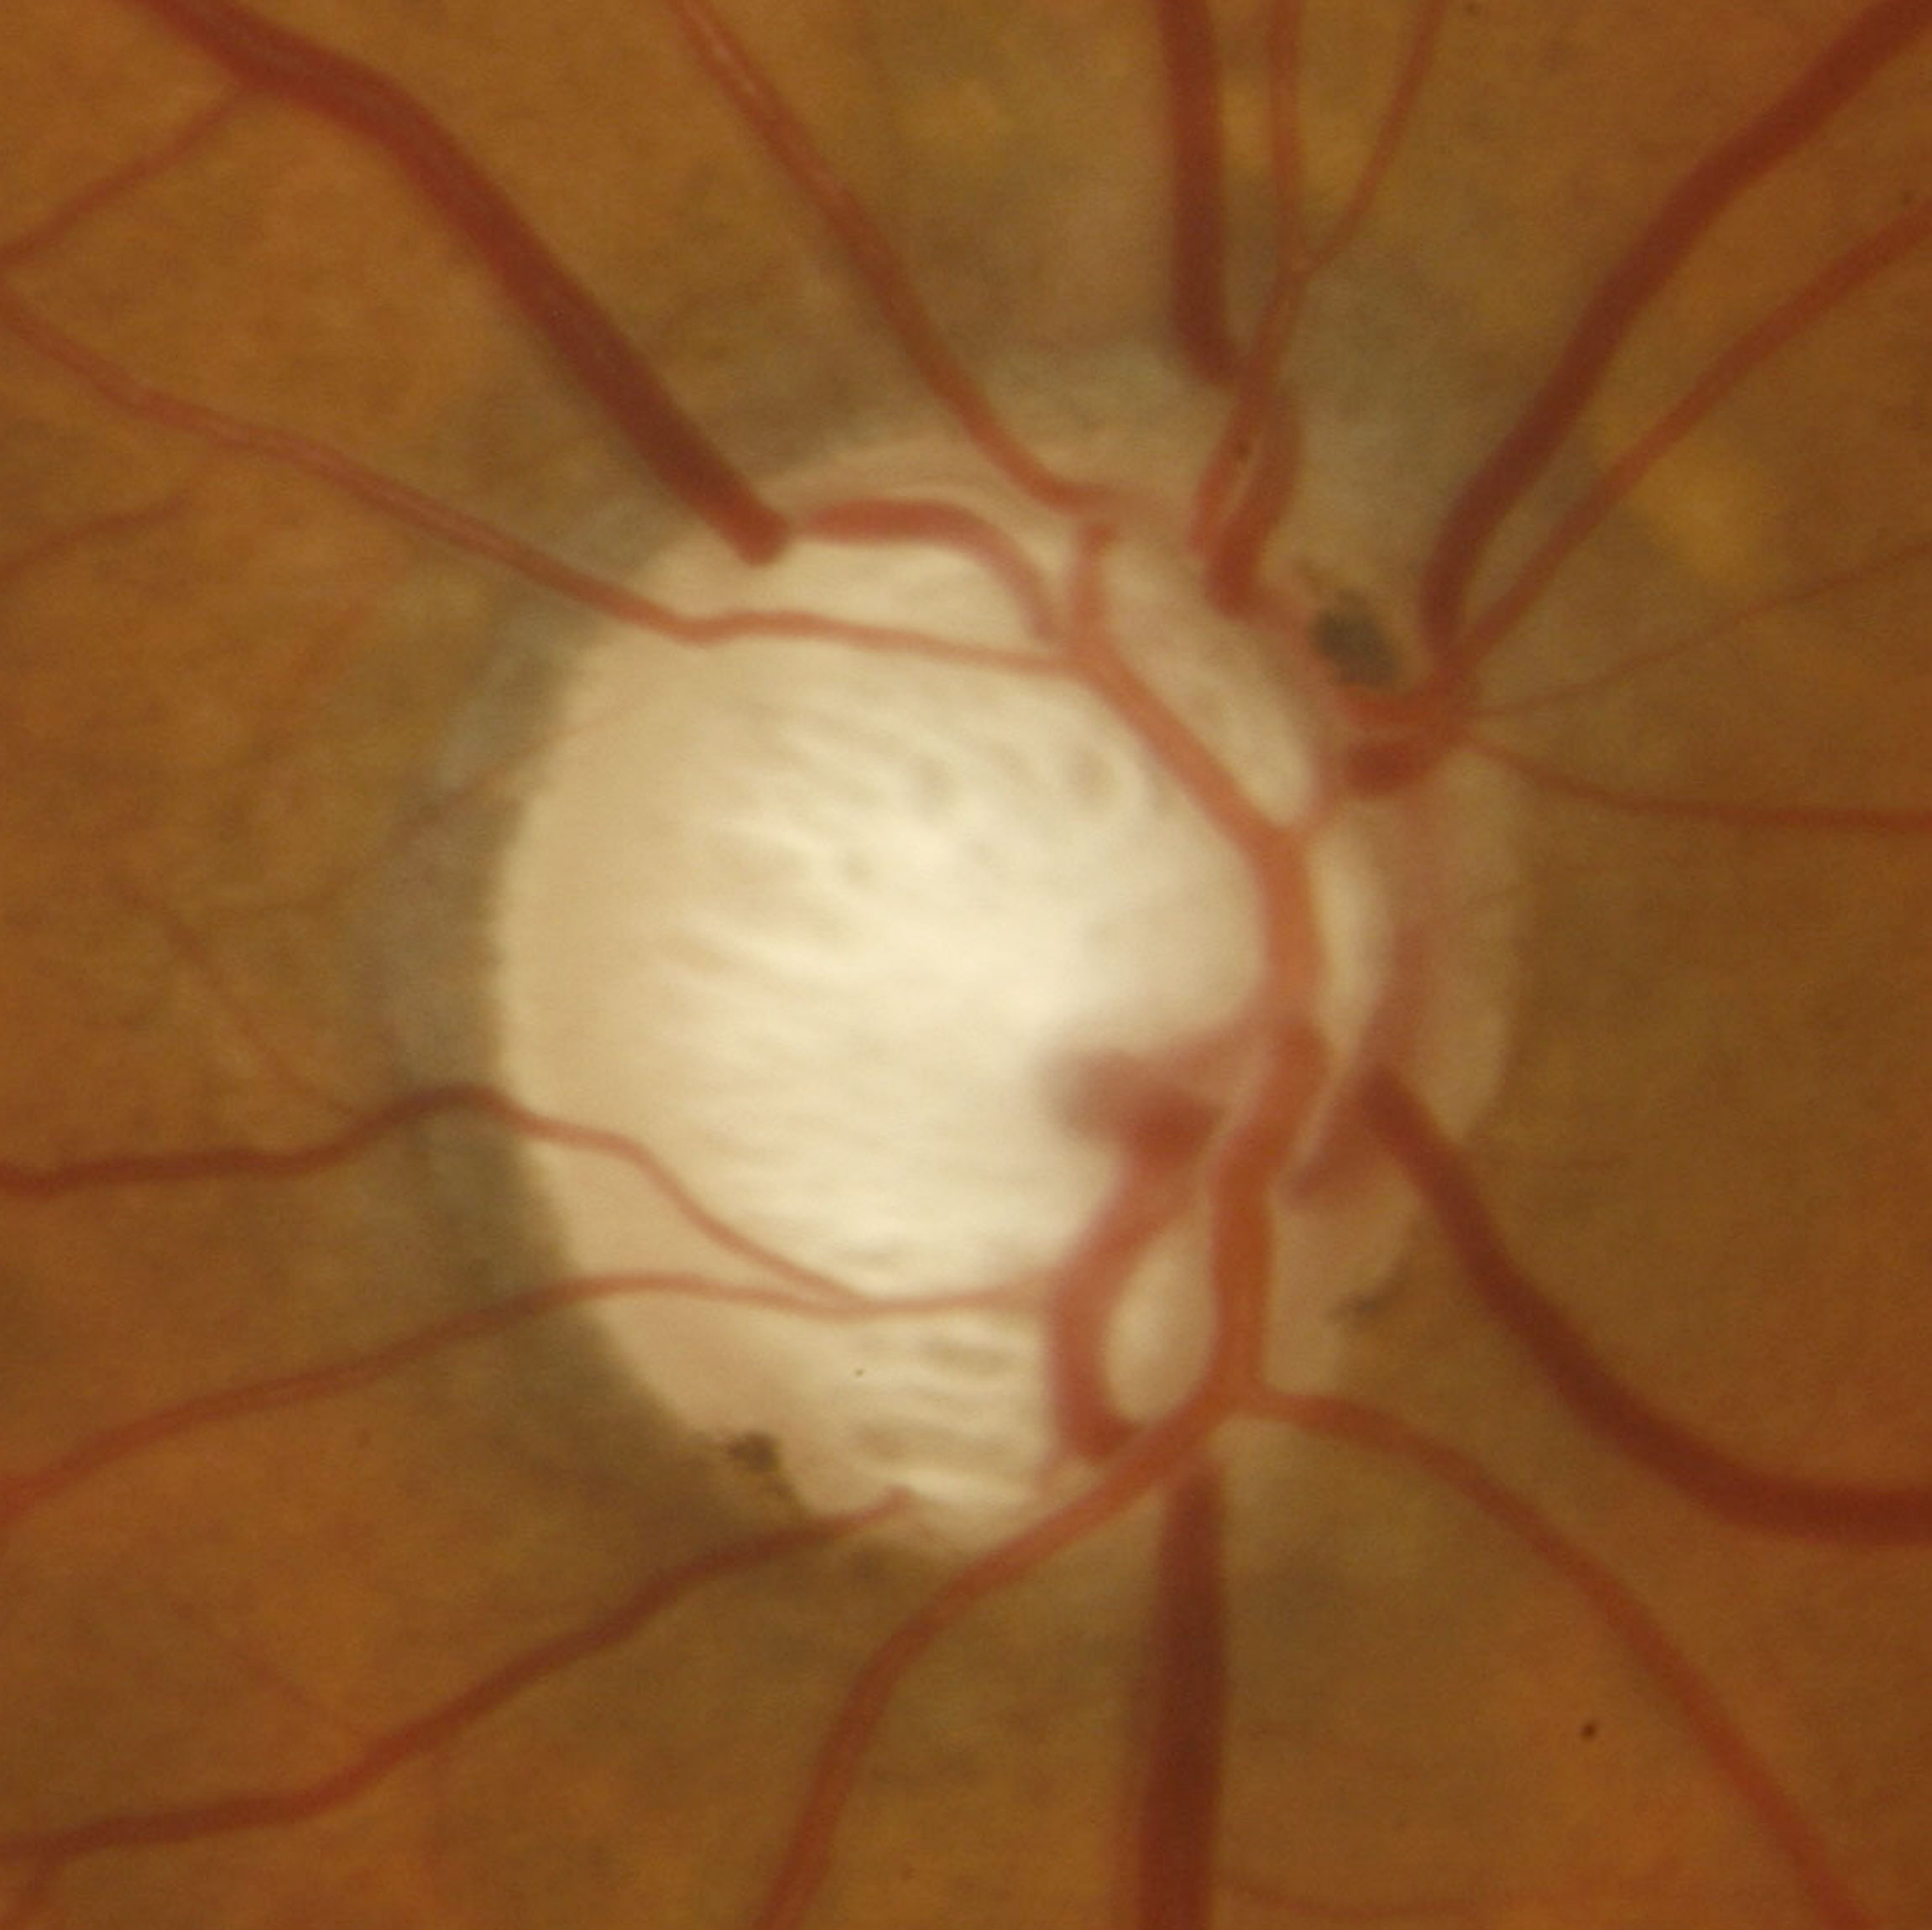
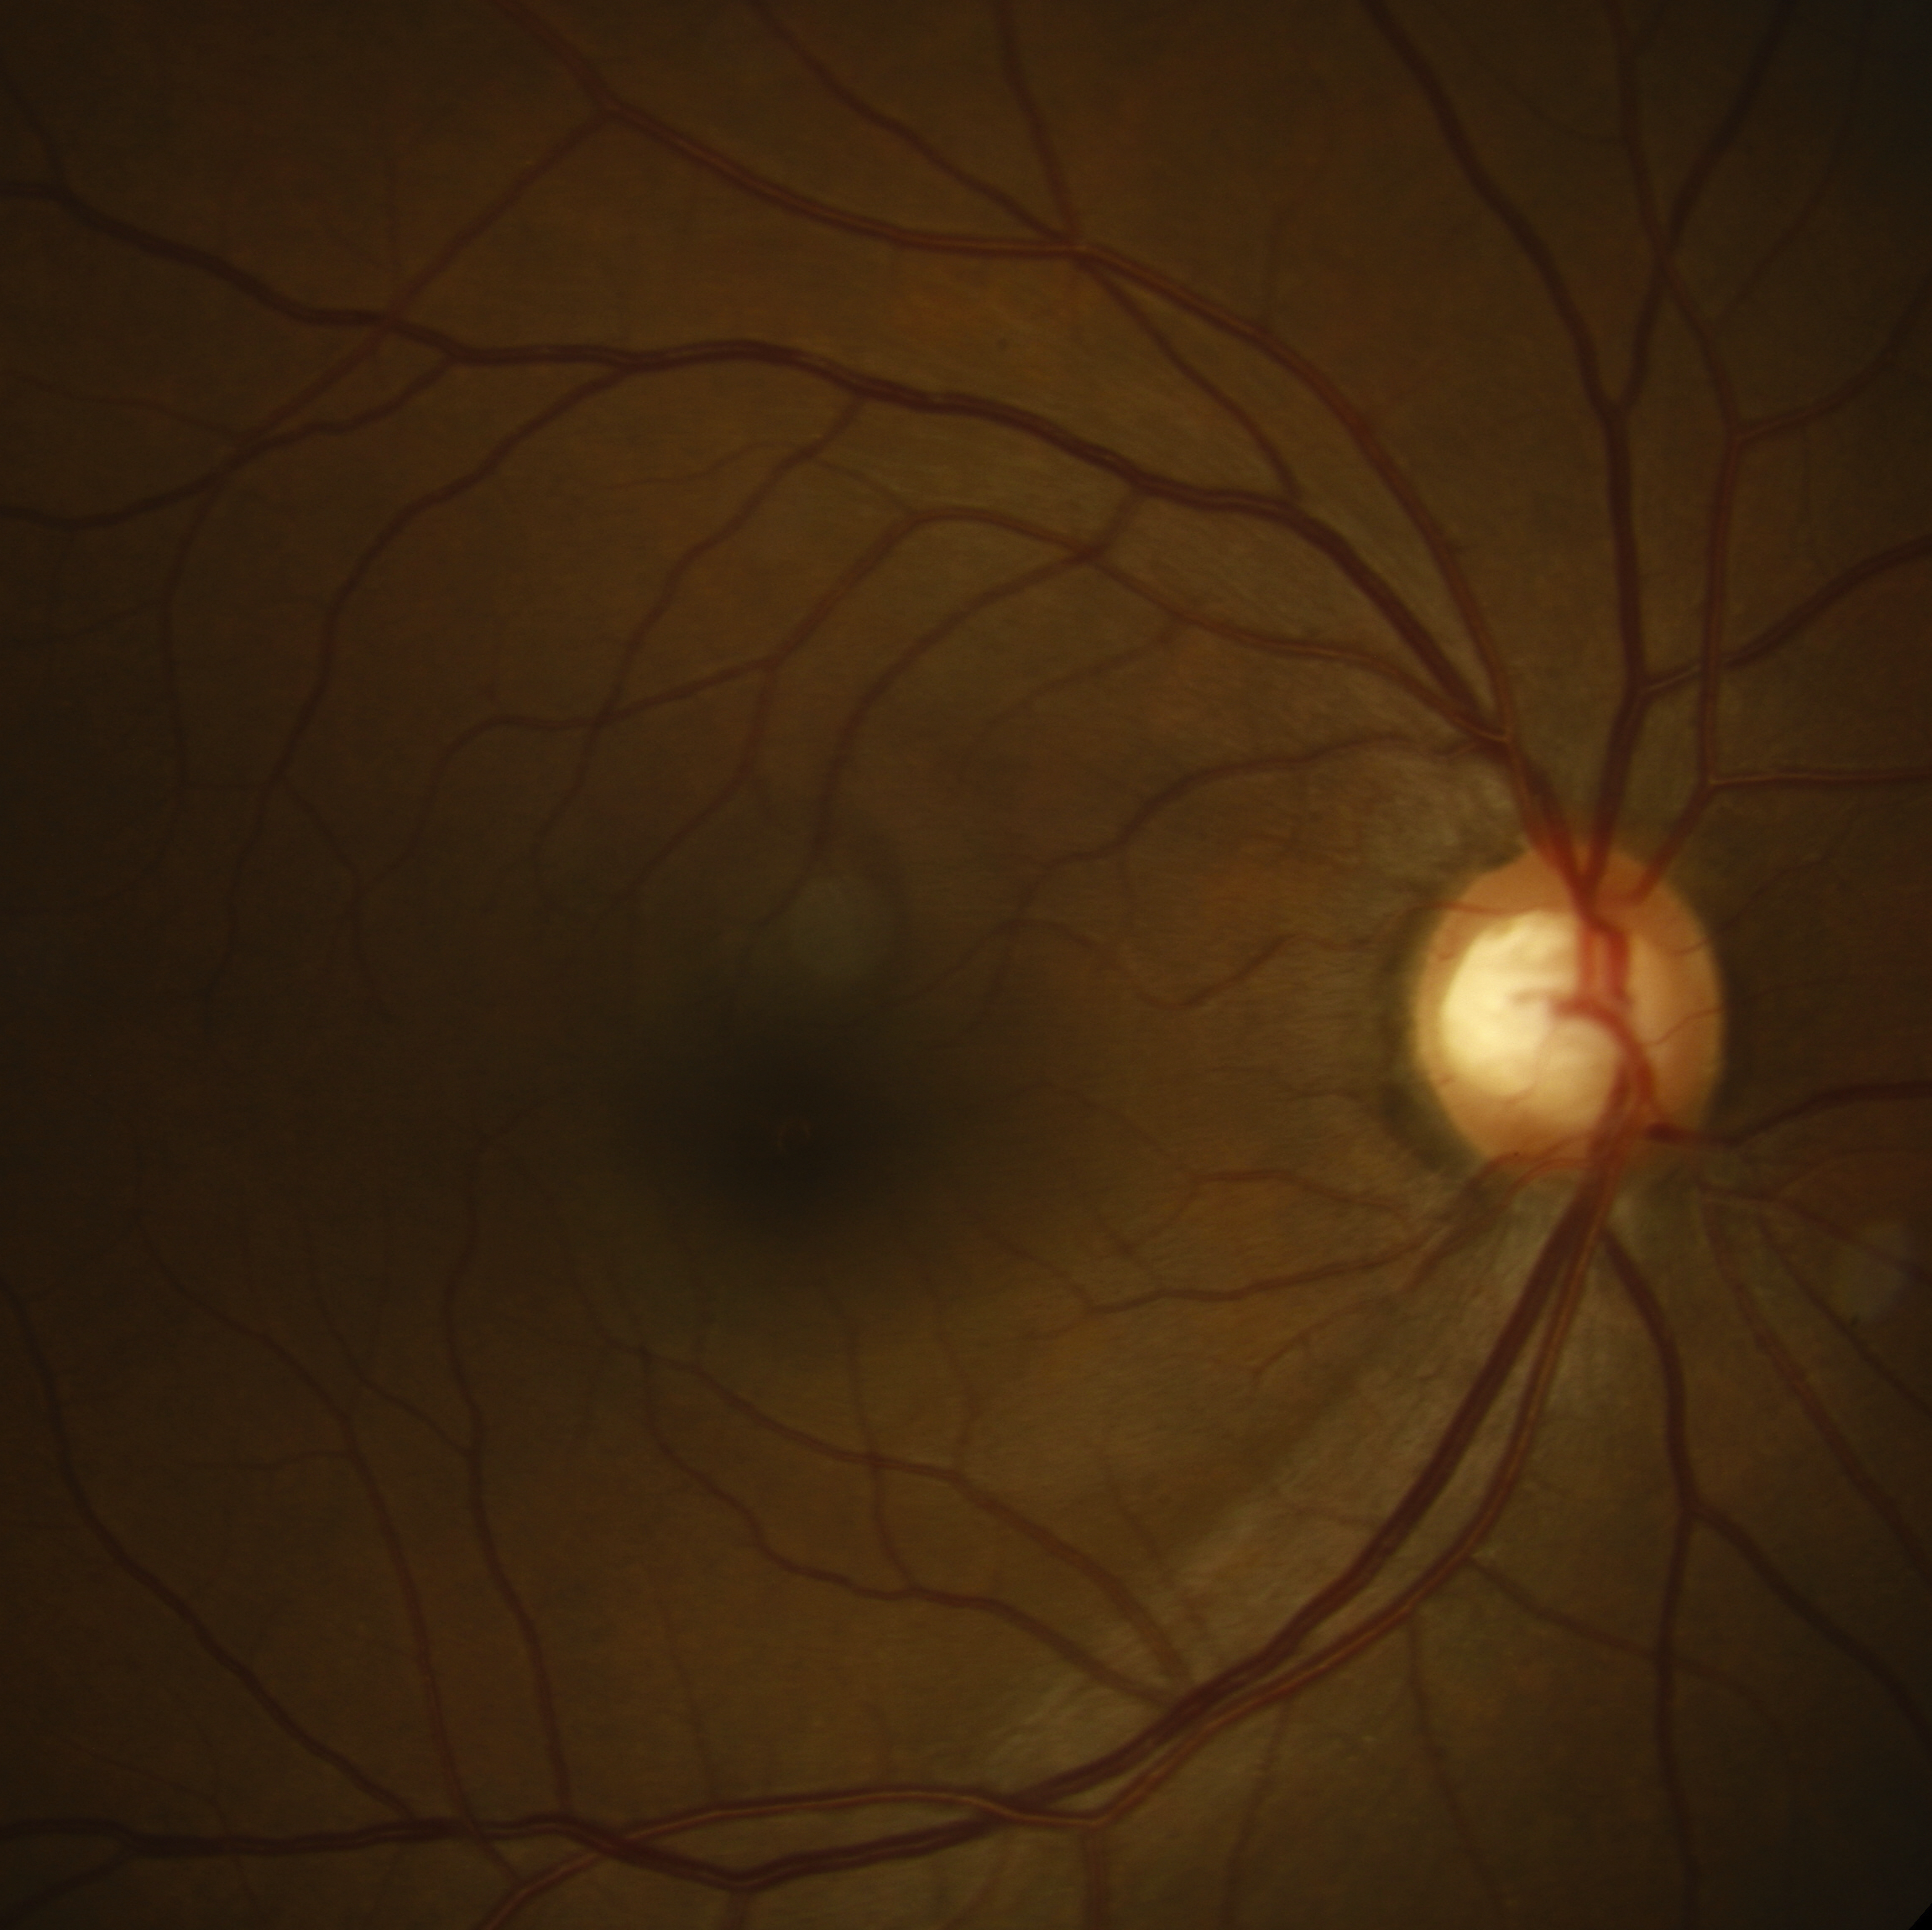
Of all the components of the glaucoma examination, inspection of the optic disc is often the most useful. Always inspect both optic discs and compare them.
- Height (vertical): Normally ∼1.8mm. Record what lens you are using as they have different magnification factors: “Super66”D 1.0X, 78D 1.1X, 90D 1.3X
- Shape
- Tilt
- Pallor: Pallor of the cup is common in glaucoma, but pallor of the neuroretinal rim should make one suspicious of non-glaucomatous pathology
β-zone PPA in particular is associated with glaucoma progression.
- Cup:Disc ratio (C:D): Usually measure this vertically at its narrowest point. Remember that large discs are allowed to have larger C:D ratios than smaller discs
- Notch
- ISNT rule: Normally: Inferior rim > Superior rim > Nasal rim > Temporal rim. This rule particularly applies for the temporal rim
- Bayonetting, undermining, nasalization, floating
- Drance (flame shaped disc) haemorrhages This is a very important sign, particularly once the disc is already “cupped out”. They are often missed and best seen with the red-free light
Use red free (green light).
Look closely for loss of striations, especially if a notch has been observed.
All rights reserved. No part of this publication which includes all images and diagrams may be reproduced, distributed, or transmitted in any form or by any means, including photocopying, recording, or other electronic or mechanical methods, without the prior written permission of the authors, except in the case of brief quotations embodied in critical reviews and certain other noncommercial uses permitted by copyright law.

Vitreoretinal Surgery Online
This open-source textbook provides step-by-step instructions for the full spectrum of vitreoretinal surgical procedures. An international collaboration from over 90 authors worldwide, this text is rich in high quality videos and illustrations.