
8.1 Objective Refraction (Retinoscopy)
For practicing, use a retinoscopy simulator kindly provided by www.eyedocs.co.uk
Early “Estimates”
A. Spectacles
If the patient is wearing spectacles (i.e. you are lucky enough that they aren’t hidden!), inspection may estimate their refraction:
- Hypermetropic (patient’s face is magnified whilst wearing them)
- Myopic (patient’s face is minified whilst wearing them)
B. Visual Acuity (Uncorrected)
Although not always permitted in examinations, testing this gives a rough indication whether the patient is a hypermetrope or myope. The patient should cover the eye that is not being refracted. As a guide:
Visual Acuity
Sphere (Minus)
Astigmatism
6 / 6
Sphere (Minus)
small
Astigmatism
small
6 / 18
Sphere (Minus)
1.00
Astigmatism
2.00
6 / 36
Sphere (Minus)
2.00
Astigmatism
4.00
Worse than 6 / 60
Sphere (Minus)
3.00
1. Place the Trial Frame on Their Head
- Adjust the Inter-pupillary distance (IPD), bridge height and length of side arms. These may not be tolerated by children, in which case the lenses can be held in place by hand
2. Fixation
- Switch off the lights and ask the patient to look at a target in the distance (do not occlude their other eye- they fixate with this). Align your head as close as you can to their fixation axis without blocking their view. Off axis refracting can lead to astigmatic errors. If you are confident that your patient is fully cyclopleged or pseudophakic (that is, they cannot accommodate) you can get them to fix on your retinoscope light instead
3. First Sweep
- Set the “plane mirror” (condensing lens) right down on the retinoscope. This “slows down” the reflex (by putting a wider beam onto the retina), making it easier to interpret.
- Use your right eye to look at the patient’s right eye and vice-versa.
- Remember to maintain a known working distance (traditionally 66cm but use a measuring tape to measure the working distance you are most comfortable with). Extending your left arm to gently rest the tips of your fingers beside their eye may assist in maintaining a constant distance. It is a common error under examination conditions to lean forward, shortening the working distance.
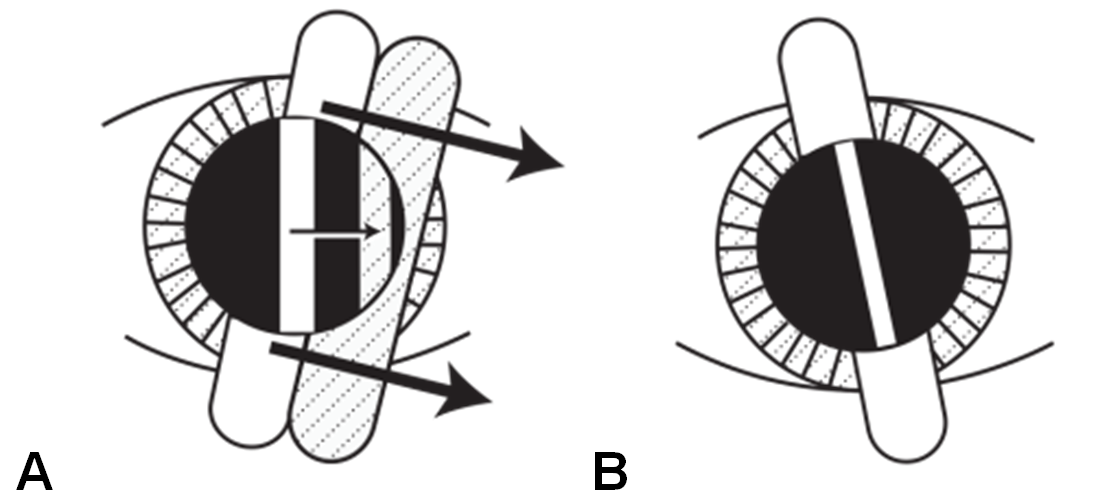
- Determine whether the reflex in the pupil gives a “with” movement (the patient is hypermetropic) or an “against” movement (the patient is myopic). It is simplest to begin two “sweeps” with the beam first at 900, then at 1800. If the refraction is spherical, these two sweeps will give the same reflex. If there is astigmatism, the following may be seen:
- “Break”- the reflex in the pupil will not be continuous with the streak on the patient’s face
- “Skew”- the reflex will only move in the same direction as the streak when the streak is aligned with one of the principalmeridia. Rotate the streak by small amounts (±10°) and move small amounts side to side until the “streak” and the reflex are aligned
- “Thickness”- the reflex will be thinnest when the streak is aligned with one of the principal meridia
- If astigmatism is suspected, perform sweeps whilst rotating the retinoscope streak through 3600 until the principal meridia are determined (as above). Irregular astigmatism may cause scissoring of the light reflex (one part of the reflex is myopic, the other part is hypermetropic)
4. Further Sweeps
- How you proceed is determined by whether you prefer using the “sphere-sphere” or “sphere-cylinder” method. The “sphere-cylinder” method is often more accurate, but the “sphere-sphere” method is simpler and makes it easier to write a power cross that some examiners may request. Hand holding spheres may also be the only method tolerated by some young children.
i. Sphere-Sphere Method
- Begin by neutralising one of the principal power meridia. It is usually easiest to begin with the one closest to 180° (align streak at 90° to the meridian). Always try to neutralise the central portion of the light reflex, that is, the reflex in the pupil centre. Check that you are aligned to the axis of a principal meridian by checking “break”, “skew” and thickness as above
- With movement → Add plus (e.g. +2D)
- Against movement → Add minus (e.g. +2D)
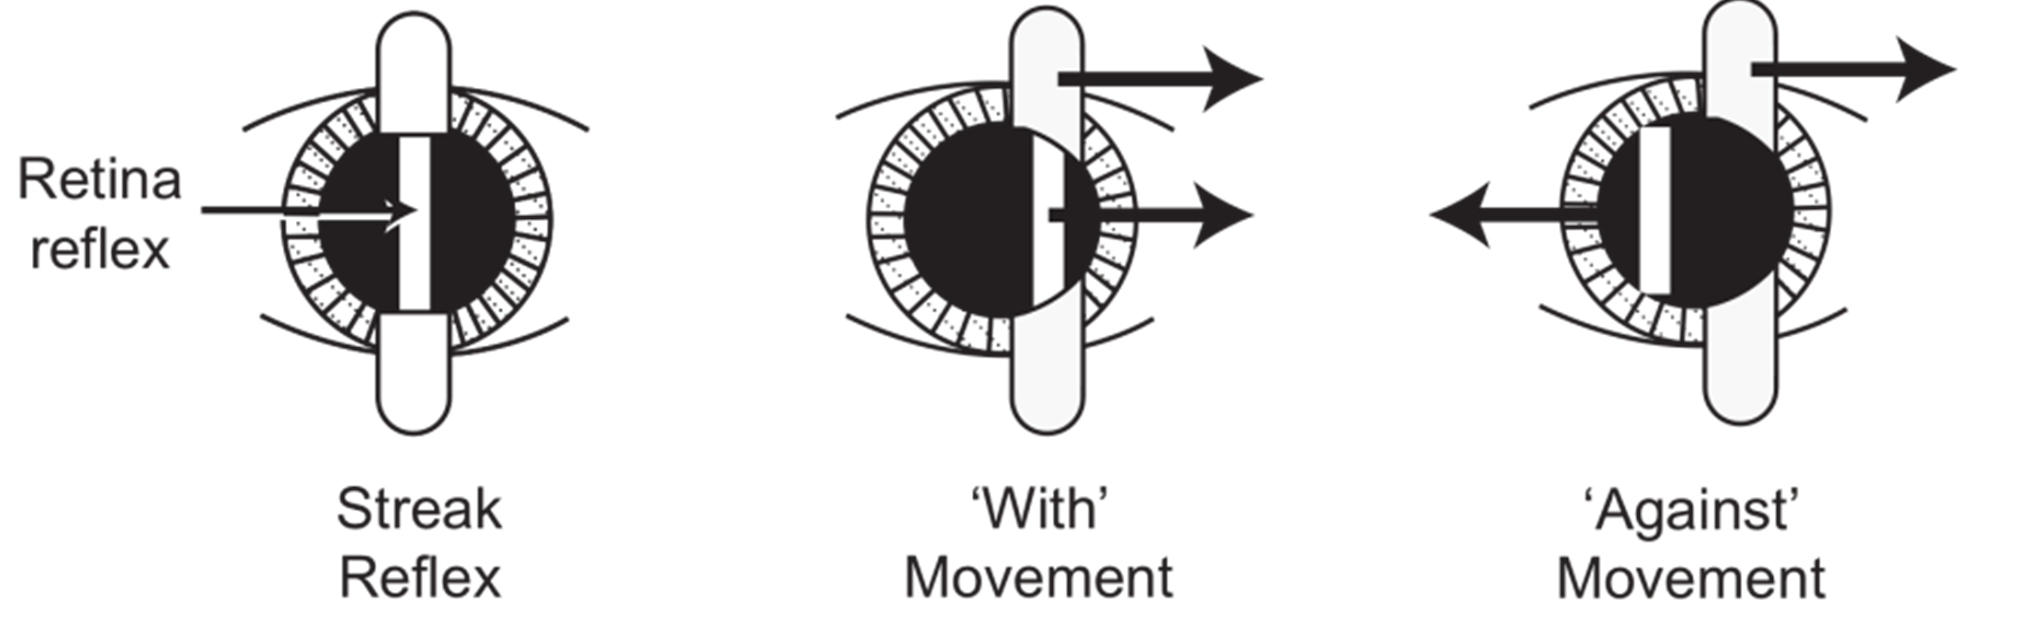
Change the trial lens powers until the retinal reflex no longer has “movement” (if there is “with” movement add plus, if there is “against” movement add minus).
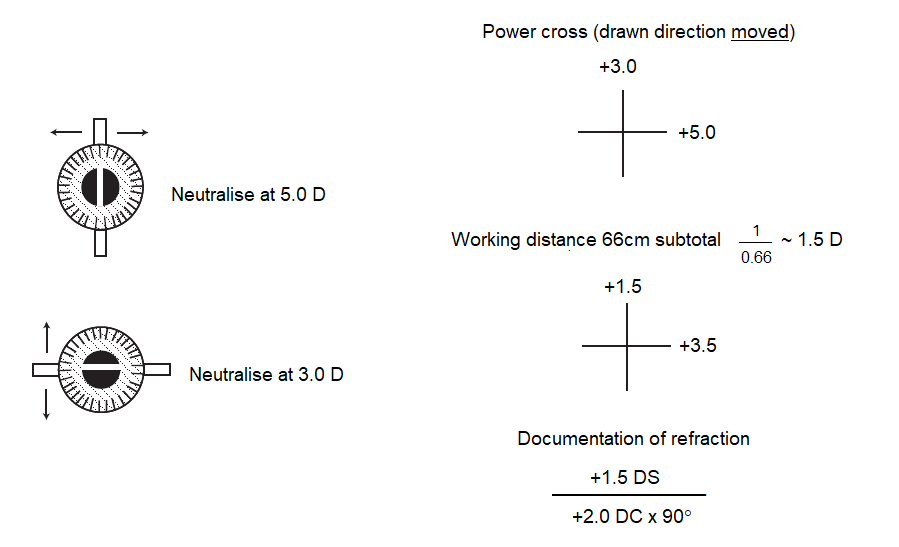
- Continue adding plus or minus lenses until the horizontal sweep shows no movement in the reflex. At this point the reflex will be diffuse, bright and fast.
- → This is the (first) sphere
- Look carefully where the streak falls on the trial frames. This is the axis of this power meridian. Consider pushing the sleeve of the retinoscope up so that you get a narrower streak to measure the axis (but remember to push it back down when “sweeping”). Remove the first (spherical) lens and place it on the table (with its “handle” pointing in the direction of the sweep) until you are ready to document it. Repeat the process for the power meridian closest to 90° (axis 180°)
- → This is the (second) sphere
- → Draw a “power cross” by recording the power of the neutralising sphere in the direction of your sweep in each meridian. Remember that the axes lie at 90° to the power meridia drawn in the power cross. Subtract the working distance and convert to a sphero-cylindrical form
Previous
8.0 Introduction
All rights reserved. No part of this publication which includes all images and diagrams may be reproduced, distributed, or transmitted in any form or by any means, including photocopying, recording, or other electronic or mechanical methods, without the prior written permission of the authors, except in the case of brief quotations embodied in critical reviews and certain other noncommercial uses permitted by copyright law.
Vitreoretinal Surgery Online
This open-source textbook provides step-by-step instructions for the full spectrum of vitreoretinal surgical procedures. An international collaboration from over 90 authors worldwide, this text is rich in high quality videos and illustrations.